Showing posts with label ornaments. Show all posts

Tuesday, January 1, 2013

Paper Globe Ornaments or Bowl Fillers


What fun to make, and EASY!  Follow these simple step-by-step directions to create your own paper globe ornaments or bowl fillers.  I adore the mini version!
You Will Need:
*two-sided scrapbook paper
**regular or mini sized scrapbooking brads
paper cutter
small hole punch (I used 1/8")

*I buy an abundance of two-sided scrapbook paper each season.  Mine are all purchased at Michael's.  The two brands I have found most often are K&Company (28 sheet, 12 x 12" pads) and Recollections Signature (24 sheet, 6" x 6" pads).  See photo below.
**I used Spare Parts by the Paper Studio brads (50 round brads, assorted metallics) and Making Memories brads (metallic basics, mini circle #23539).

How to Make:
1. Cut 3/8" strips of paper.  The number of strips will depend on the size of globe you choose to make. 
Size Guidelines: 
Mini (as shown in photo on hanging on tree) -- 8, 3/8" x 3 1/2" strips
Small -- 10, 3/8" x 4" strips
Medium -- 12, 3/8" x 5" strips
Large -- 12, 3/8" x 6" strips
2. Punch a hole in each end of the stips.  Make sure to punch holes in the same place.  I stacked 4 strips at a time and used one as a guide for all others.
3. Stack strips so designs alternate.

4. Place a brad in each end making sure to pass through all strips. Affix tightly, as this will help strips to stay in place once "fanned" out to make globe.
5.  Slightly bend stack as shown.  Do not fold. This simply helps to form the spherical shape as strips are "fanned" out.
6.  Carefully "fan" out strips into desired positions forming a sphere/globe.
 
7.  Use as bowl fillers or make a hanger with plastic threads or fish line.  I simply tied plastic thread around/under the brad and knotted the ends to make a loop for hanging.
With the wide selection of two-sided paper colors and designs, you are sure to find those that will match your taste and decorating needs. 

Monday, December 31, 2012

Snowman Bottle Cap Tag Ornament


Using bottlecaps is great fun, and I love to create things with tags!  Try making a bottle cap tag ornament of your own.  The possibilities are many!  Included here are a list of materials, a bottle cap printable sheet, and step-by-step directions.  Enjoy!
You Will Need:
*bottle caps (number depending on how many you want to make)
2 2/3" x 1 3/8" - #1 strung shipping tags with reinforced hole (I used Avery brand #11004 - 100 count)
**coffee for staining tags (brew or instant)
***3D crystal lacquer (by Sakura Hobby Craft)
snowman bottle cap insert printable
1 inch circle punch
printer
laminator or clear packing tape.
black Sharpie marker (ultra fine point)
glue gun and glue
 
*I always purchase my bottle caps from Lehman's. You can find bottle caps for purchase in many places online.  You can buy them with and without the rubber seal, and the prices vary.
**My husband made a strong mixture of coffee using two scoops of coffee and about a cup of water.
***I have experimented with different clear lacquers and have found this one to be the best for my needs.  No mixing is required, it easily dispenses without bubbling, it does not have a strong smell, and it dries crystal-clear.  I purchased it directly from the Sakura Hobby Craft website.
 
How to Make:
1. Download and print snowman bottle cap insert here.
 
2. Laminate (not heavy seal) or cover inserts with clear packing tape (being careful to adhere smoothly).  I do this so that the ink will not run when the clear lacquer is applied. 
 
3. Punch out inserts.
4. Carefully press insert into bottle cap.  It is not necessary to remove the rubber seal inside the bottle cap for this application.  Press the insert gently into the bottle cap, without pressing it firmly in the center.  Pressing too firmly will create seal marks on the insert.  I simply press the insert into the bottle cap by lightly pressing in the center and around the edges with my fingernail.  See photo for finished look.
5. Fill bottle cap with clear lacquer.  Make sure to read the directions on bottle prior to using. Fill the bottle cap to the brim, as the lacquer will naturally shrink as it dries.
6. Allow clear lacquer to dry overnight.
 
7. Make coffee mixture as dark as desired. Keep in mind that the tags will appear lighter when wet and will dry darker.
 
8. Dunk tags in coffee mixture and lay on several layers of paper towels to dry.  Once I placed the tags on the paper towels, I poured a bit of the coffee mixture sporadically on the tags.  This created a primitive stained look when tags were dried.  Allow to dry completely.
 
9.  Write desired words in creative lettering using a black Sharpie marker (ultra fine point). Make sure to position a bottle cap as desired so that you can judge the size and location of your words/writing. 
 
10. Knot the ends of string together and hang. These also make great gifts!
11.  Try creating your own inserts using a desired picture/theme.  Bottle caps can be easily customized and made into ornaments, magnets, and pins.  Here are a few caps I created years ago...  These are much clearer that they appear, as the lacquer glare so easily when photographed. Note: These bottle caps were not hammered to curl the edges.  Nothing was done to the bottle cap prior to filling. I have made many bottle cap crafts over the years where I have hammered and removed the rubber seal, but that is a lesson for another day...


Friday, December 14, 2012

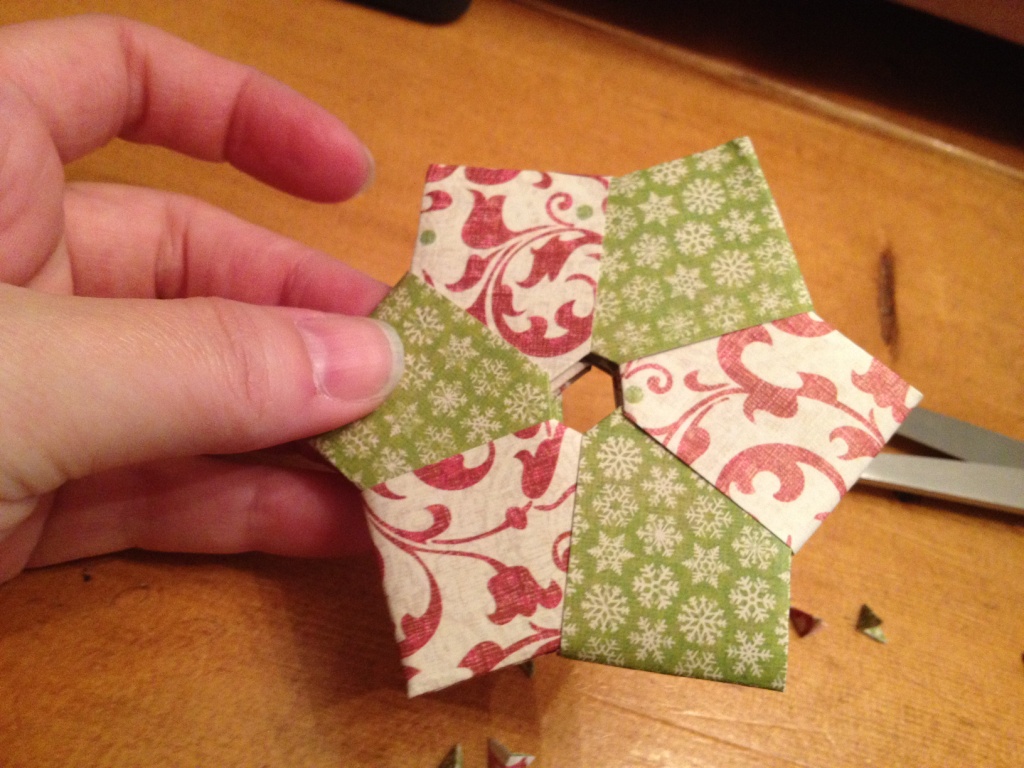
Paper Folding: Star/Wreath Ornament


These folded paper stars/wreaths turn out wonderful!  I had great fun last weekend making some for my grandson (for gifts) after he picked out the paper combinations.  Great to hang on the tree, tie on a gift, use as bowl fillers, etc.!


You Will Need:

two scrapbook papers of complementing design/color
paper cutter
scissors
thin jute or string for hanging

How to Make:
1. Cut scrapbook paper into 6, 2.5" x 5" pieces (3 of each design/color).

2. Fold each piece in half lengthwise, with design/color facing out (see photo).

 
3. Open each piece, flatten with design/color side face-down, and fold in each corner to "meet" the fold (see photo).

 
4.  Refold on lengthwise fold (see photo).

 
5.  Fold each piece in half with pointed tips meeting (see photo).

 
6.  Holding on the fold, snip off each tip (see photo).

 
7.  Assemble star by following each step as shown in the photos below.  Make sure to hold pieces as demonstrated.


8.  Cut a piece of jute, match up the ends, and feed the loop through the center of star/wreath (see photo). 

 
9.  Feed ends of jute through loop and pull taut.  Knot at the top.


I love making these!  Choose paper to fit your style--the combinations are many!